Configuring SNMP v3 on Cisco router and ManageEngine NetFlow Analyzer
- SNMP (Simple Network Management Protocol ) is an application-layer protocol that helps communication between SNMP managers and agents. SNMP is used for monitoring and managing the devices in a network.
The frameworks of SNMP are
SNMP manager
SNMP agent
MIB (Management Information Base) - SNMP works in manager-agent model, that is the SNMP manager requests information for a specific variable and on receiving this request SNMP agent will send a response. This response can either be the requested information or an error message. Both, the SNMP manager and the SNMP agent, use MIB to exchange these information.
There are different versions for SNMP. SNMPv1 which is the Simple Network Management Protocol and this is the first version of the protocol. SNMPv2c, this is the revised protocol, includes enhancements of SNMPv1. The enhancements are in areas like protocol packet types, transport mappings, MIB structure etc.
A new version called SNMP v3 was introduced with relatively better security related features over its earlier versions. SNMPv3 promised better security and efficient administration. With SNMP v3, authentication, privacy, authorization, access control and more security enhancements were added.
Now let’s see how to configure SNMP v3 on a Cisco router. SNMPv3 is supported from the IOS version 12.0.3T and above.
The SNMP v3 should be created in an order, the "View" is created first then a new "Group" and then "User" is associated with the group. - Creating an SNMP View Record:
Router(config)# snmp-server view view-name oid-tree {included | excluded}
Note: Helps create a view record.
Example:
Router(config)# snmp-server view target1 internet included
Creating a SNMP group in V3
Router(config)# snmp-server group [groupname{v1 | v2c | v3{auth | noauth |priv}}] [read readview] [write writeview] [notify notifyview] [access access-list]
Note: Configures a new SNMP group, or a table that maps SNMP users to SNMP views. We recommend to use the "write" option while creating the group, since this is needed for the NBAR polling to happen properly.
Example:
Router(config)# snmp-server group mygroup v3 auth write target1
Creating a snmp user in V3
Router(config)# snmp-server user username [groupname remote ip-address [udp-port port] {v1 | v2c | v3 [encrypted] [auth{md5 | sha} auth-password [priv des56 priv password]] [access access-list]
Note: Configures a new user to an SNMP group
Example:
cisco2811(config)#snmp-server user myuser mygroup v3 encrypted auth md5 myuser
Why SNMP is used in NetFlow Analyzer ?
SNMP Port and Community of the router is used for the following:
1) Determine the interface speed
2) Retrieve the interface and router name
3) For NBAR and CBQos polling
4) To check if link is active
Now let us see how SNMP v3 is configured in NetFlow Analyzer UI.
Click on the “set SNMP” on the top left of the interface view of NetFlow Analyzer GUI, this will pop up a new window. In this new widow put a check mark on “Enable SNMP v3 ”. Now click on, “credential setting for all routers ” which opens a new window.

In the new window click on “Add New ” this opens a new credential settings window. Type in the settings and click on Add. The context name should be given only if one is given in the router.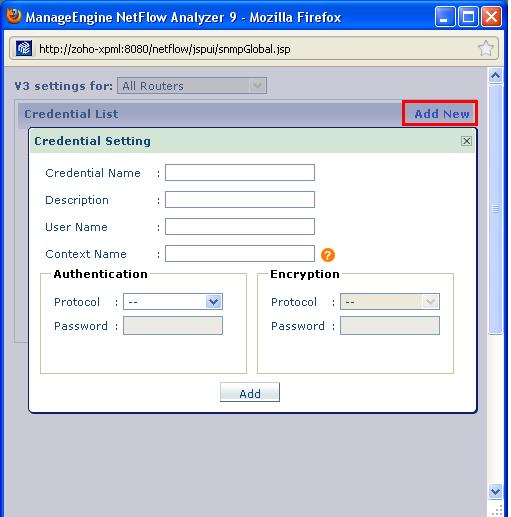
Now you have to select the concerned credential name and click on apply. This will apply the credential settings to the router.
Hope this gives a better understanding of how to enable SNMP v3 on the router and applying the same in NetFlow Analyzer.
Download the 30 day trial from here.
Praveen Manohar
NetFlow Analyzer Technical Team
Download | Interactive Demo | Twitter | Customers