We have discussed about application detection and grouping in our previous blog . Now it is time to implement QoS policies based on the results. To provide preferential service to a specific type of traffic, it is necessary to define a class based QoS policy to raise the priority of the traffic. Here the class refers to different traffic classes or types identified in the discovery phase.
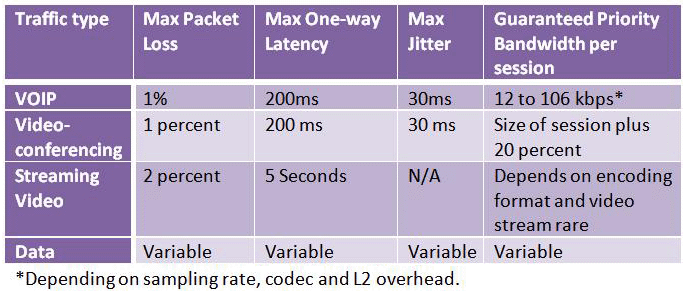
Fundamentally, QoS helps to reduce the delay and jitter for sensitive applications like VOIP or video by raising the priority of a flow or limiting the priority of another flow. Before deploying QoS policies it is important to know the threshold settings of max packet loss and max delay for those traffic classes like VOIP. This helps us to allocate more bandwidth and increase the priority for delay sensitive applications. Here are the max delay and jitter specification for voice, video and data traffic recommended by Cisco.
Now let us dive deeper into QoS configuration. It has four steps
1. Creating a traffic class or class-map
2. Creating a policy or policy-map
3. Associate a traffic class to a policy
4. Attaching the policy to an Interface
1.Creating a traffic class or class-map:
Traffic class helps to identify and name a specific traffic flow (or class) from all other traffic using different matching criterion. A traffic class is determined using a match criterion like port, protocol, IP address or an access group in ACL. Using the “class map” command one can define the traffic class with the desired criterion used to match against a specific traffic flow to further classify it.
2.Creating a policy or policy-map:
Policies help us in priority routing and queuing of the packet. This is achieved by a variety of means like – providing dedicated bandwidth, limiting bandwidth, creating queues with different routing characteristics, dropping the packets etc. A policy can be defined using the “policy map” command. Each policy specifies the action to take for packets that are in or out of profile.
3.Associate a traffic class to a policy:
Once the policy actions are defined, these actions can be associated with the desired traffic class. This helps to apply the specific policies to the traffic classes. A policy can be associated with one or more traffic classes.
4.Attaching the policy to an Interface:
Once all the class maps are associated with the defined policies, policy maps are associated with the interfaces. Here it is possible to specify the direction in which the traffic policy should be applied (either on packets coming into the interface or packets leaving the interface).
The following is an example CBQoS policy to raise the priority of voice traffic.
class-map match-all VOICE
match access-group name VOIP
ip access-list extended VOIP
permit udp any any range 16384 32767 precedence critical
permit tcp any eq 1720 any
permit tcp any any eq 1720
policy-map VOICEFAST
description Policy 6 M to MPLS
class VOICE
priority 600 64000
set ip precedence 5
The above policy provides priority with dedicated bandwidth to voice traffic with the hosts specified in the ACL list. Also sets the IP precedence bit to 5 which is critical application specification. Also click here to find how to block skype in your network using NBAR based application detection and CBQOS
And next is going to be an add-on post in this series which is very useful for VOIP deployments. I am going to talk about the NetFlow and VOIP add-ons for our OPManager in the next blog and how these add-ons are going to be helpful in QoS policies.
Thanks
Raj


